Monday, September 27, 2010

Gardening: Tomato Frustration

It's September, and the beefsteak tomatoes are still green. I don't mean that some of them are green, or that the 2nd set is green, I mean they are ALL GREEN. I'm getting ahead of myself. Let's begin at the beginning.

Back in late May we planted 5 tomato plants. 3 were called "Sweet Baby" cherry tomatoes. The other two were "Mountain Harvest" and "Beefsteak" respectively. We didn't want to overdo it with too many plants. Last year, after all, was a horrific failure. What few tomatoes did emerge were quickly taken over by a blight, and we did not get to eat a single one. So naturally, we did not expect too much this year. We were wrong.

In early June we found a tomato plant, growing strong back where the pig pen used to be. This volunteer plant looked so nice and healthy that we decided to plant it in the last spot with the big tomatoes. After all, the bush beans had failed miserably in that spot, so what did we have to lose? The space was probably wasted one way or the other.

The early signs were not great. The tomato plants were tall and spindly with few leaves. So, as soon as the first flowers appeared, Mr. Farmer cut all the tops off just above the flowers. I really thought they were going to die. Instead they stalled- then bushed out! Two rows of flowers turned into four and eight and more! Before we knew it, we were up to our eyeballs in cherry tomatoes- at least we would have been if the tomato plants weren't right next to the front door where all who entered or exited could see them and be tempted by their beautiful bright red color.

Soon after the first cherry tomatoes reddened, the first large tomatoes bloomed. Little tomatoes became big tomatoes and... that's it. They just stopped growing. Hard, full size tomatoes sat on the vine and did nothing as weeks became months. A handful of cherry tomatoes were enjoyed each day along with the thought, "Maybe tomorrow the big ones will turn red." Neighbors and co-workers gave gifts of big, overripe tomato excess from their gardens, and yet ours stayed green.

On the 13th of September, the hail came. A slight blush had finally graced ONE of the large tomatoes and hopes were high. But in the early evening, a furious storm came through, pounding with pea-sized hail and equally large raindrops. The garden looked like it had seen the first fall snow. The only difference was that the white ice was only on the ground, not on the leaves of the plants. We figured our tomatoes were done for.


Much of the foliage on the tomato plants died off, but the large tomatoes remained, and the cherry tomatoes continued to redden. The herb garden wasn't so lucky:


My Poor Parsley- Beaten Flat and Frozen- Perhaps Dead

Our Beautiful Basil- Now Perforated from the Hail


Even My Seemingly Indestructible Chives Succumbed

We removed as much of the hail as possible as quickly as possible, and the work paid off. But the large tomatoes are still green. They are dented, but they are still rock hard and dark green. I wonder if we will be able to eat any of them before the first frost hits???


*****LATE SEPTEMBER UPDATE!!*****

They're red! Finally! As of September 27, we have SIX red tomatoes, and several more are beginning to blush. We might be able to eat them all before the leaves are off the trees and the first snow falls after all!

Saturday, September 18, 2010

Cooking: Sunday Night Steak Chili

I call this "Sunday Night" Steak Chili because:

1) I made this exact recipe on a Sunday Night.
2) It is labor intensive, so it took all Sunday afternoon to make.
3) It is appropriate for company or Sunday night dinner.

Ingredients:

1 large onion -coarsely chopped
4 cloves garlic - peeled, ends off, scored
1.5 lb London broil, cubed large
Pickled Jalapeno Peppers
Salt and Pepper
2 cups mild salsa (jar or homemade - or substitute 1 large can whole tomatoes, chopped, with juice)
1 lb dried red kidney beans

In large crock pot (or stove over low heat) add onion, 3 of the cloves of garlic, the London broil, 2 tsp salt, 1 tsp pepper, and jalapeno peppers (I used 5 pepper slices plus 2 tsp of the pickling liquid. You may want to use more or less depending on if you use salsa or tomatoes and how hot you like it.). Cover and allow to cook slowly, stirring occasionally.

Prepare the Beans (obviously, you could skip all this if you used canned beans- just drain them.):
Rinse beans and put on stove to boil.
After 15 minutes at a full boil, remove from heat, strain, and rinse again.
Return to stove for a 2nd boil, this time adding the remaining garlic clove and 1 tsp salt.
After about 30 minutes (or when beans are almost completely cooked), drain and add to meat in pot.

Add salsa or tomatoes, cover and cook. The longer the better, but at least 2 hours.

*NOTE: I used this salsa in my chili for the tomato part... Fresh Salsa Recipe http://goo.gl/b/Knz9

Thursday, September 16, 2010

Cooking: Smoked Hard-Boiled Eggs

You can smoke lots of things to make them yummy. When we heard smoked hard-boiled eggs were an option, we just HAD to try it! You can't taste them on a blog, I'm afraid. But if you like snacking on eggs, then you would like these. The smoke flavor is subtle, not overwhelming.

We partially boiled the eggs before we smoked them. Basically we covered them with water, brought the water to a boil, and instead of boiling for 10-12 minutes, we took the boiling pot off the heat and let it stand for 12 minutes. Then we drained and rinsed the eggs in cool water, broke the shells (to let the smoke in better), and placed them into a nylon stocking to hang in the smokehouse. We hot-smoked them for about 2 hours (though I have heard that as little as 45 minutes is plenty).

The result was fully cooked, slightly smoky eggs for snacking, deviled eggs, or egg salad. Yum!

Eggs - Sharing the smoker with the chickens

Sunday, September 12, 2010

Cooking: End Of Summer Macaroni Salad

Seasonal food is about what is fresh, available, and cheap (at the moment). Summertime is Salad-Time, and it may seem like I'm out of order by posting the last salad first, but here it is just the same. It is a sweeter salad because of the peas and peppers, but variety is good! As with all of my recipes, this is a large family/company/covered dish dinner sized meal. Cut it in half if you are only feeding 2 or 3 people, or if your kids aren't teenagers yet.

  • 1 lb dry pasta (I like medium shells with salad that has peas in it, but pick your favorite.)
  • 1 small onion, finely chopped
  • 1 super-large or 2 regular-sized red bell peppers, finely chopped
  • 1 1/2 cup sweet peas (that's a 15 oz can if your peas failed this summer like mine did - otherwise, give fresh ones a quick boil)
  • 4 hard boiled eggs, peeled and coarsely chopped
  • Vegetable oil
  • 1 1/2 cup mayonnaise
  • Salt and Pepper to taste
Bring water with a little salt to a boil. Once boiling, add pasta and stir. Cook until completely done, strain, rinse and cool.

While your water is boiling is a good time to chop up all those veggies and eggs, and shuck peas if needed. Once the pasta is ready, toss everything together EXCEPT THE MAYO. The little bit of vegetable oil will keep the pasta from sticking while it cools. Chill until at least room temperature (completely cool is even better) then add the mayonnaise. This will keep the mayo from separating, and is also good food safety.

It may go without saying, but I will say it anyway: Keep hot foods hot and cold foods cold. For outdoor picnics, place any salad with mayo in it into a larger bowl filled with ice for safety. Besides, most people like their summer salads ice cold anyway (I have met one exception, and one only).

Friday, September 10, 2010

Cooking: Whole Smoked Chickens

The smoking process we use to smoke chickens is more of a flavorful cooking method than a preservation technique. For long term storage of these chickens, we zipper bag or vacuum seal and freeze them. Inexpensive whole fryers work just as well for this method as roasters, and we use them almost exclusively.


***STEP 1: CURE***

Thaw birds (if necessary) and remove gizzards as needed. Check for feathers that might have been missed and remove.


While we do not prefer it for ham, we LOVE Morton’s Sugar Cure for smoked chickens. Add about 1 tablespoon of cure per gallon of water and brine, chilled, for at least 24 hours. If you don’t have a large enough refrigerator, you can add ice a few times a day.


*** Step 2: PREPARE***

Drain chickens and insert each into a knee-hi nylon stocking. The stocking makes a nice bag with a handle to hang the chickens by and also makes for a very even brown skin. Special thanks to our neighbor from the old country in Lithuania for this little trick.


Whole Chickens Hanging in Stockings (Draining)


***Step 3: SMOKE***


Hang chickens from smoker by the tops of the stockings. Hot smoke for 10 hours for 5 pound average birds.


Chickens in Smoker
Smoker in Action


Mr. Farmer doesn't care to share his exact cooking times just yet. If he does, I will update. But look how pretty and brown they look once they are fully smoked!


Whole Smoked Chickens - YUM!


Our preferred hardwoods for smoking chickens are cherry and maple, but hickory is nice too.

SERVING SUGGESTIONS:

1) Serve hot, roast-style, with potatoes. If you are going to smoke whole potatoes, parboil & pierce them prior to smoking. The low temperature of the smoke will not sufficiently cook the potatoes even in 10 or 12 hours. Trust me.

2) Cold smoked chicken is great for picnics. Just throw it in the cooler and take it along. Great on cold sandwiches or just as a side with potato, macaroni, or green salad.

3) Chicken Salad: Pull chicken, chop small, and mix with mayo, celery, & onions.

4) Pulled Chicken: Pull chicken, mix with just a little of your favorite BBQ sauce (maybe one day I'll post Mr. Farmer's recipe) and heat. Serve on round rolls with potato salad.

Monday, September 6, 2010

Hillbilly Ingenuity: The Smokehouse

The basic smokehouse setup is really fairly simple. Smoking is an indirect kind of cooking that combines heat (sometimes) and smoke to flavor and in some cases preserve foods. Most smokehouses consist of a smoking/cooking chamber, a fire box, and a pipe to connect the two. Additional amenities can be added or removed depending on your needs.


**THE FIRST SMOKER**

Mr. Farmer often speaks of writing a book called “101 Uses for a 55 Gallon Drum”. This is one of those uses.


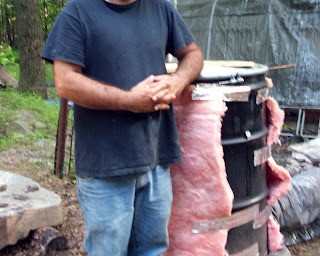
The first smoker setup consisted of a 55 gallon drum with a lid. Mr. Farmer fitted a pipe into the bung as a smokestack, drilled a small hole in the side to insert a thermometer, and a larger hole for the smoke pipe in the side near the bottom. A few more holes near the top were drilled to fit a few pieces of concrete re-bar to hang meat.


Then he built a simple firebox out of local stone around the other end of the smoke pipe, and covered the top with wet sandbags to keep the smoke in while cooking. This was inefficient, so he pasted it closed with mortar.


After a few attempts, he found that it was hard to regulate the temperature, so he wrapped the drum and pipe in standard household fiberglass insulation. A number of hams and bacons were processed through this simple smoker.

**THE UPGRADE**

The new and improved, Upgraded Smokehouse was built on the same site, starting with the same stone firebox. The firebox was expanded to a larger size and cemented closed for a more permanent smoke seal. A metal door was also added for easier feeding.


The new smoke chamber was built of pine, and we jokingly refer to it as “the outhouse” since its design is very familiar to that country standby.


To differentiate it from an outhouse, we considered putting some artwork on the outside to indicate what might go on inside. Little Miss Farmer (12) is quite the artist, so we asked her to draw a pig for us to wood-burn onto the outside of the smoker:


We decided against that particular design- at least for now. The smoke chamber, for now, remains unadorned. There are 2 thermometers- one in the door and the other in the smoke vent (a ladder is needed to see the vent thermometer).


So far we have processed hams, chickens, and even hard-boiled eggs through this smokehouse. During longer smokes we hose down the interior with cool water- you can see a bit of charring and smoke buildup inside.

Friday, September 3, 2010

Off Topic: The Zen of The Cosmotron

An unassuming, single-story grain silo is tucked behind the classic Tea Cup ride and the very popular “Paratrooper” at Knoebels Amusement Resort in Elysburg, Pennsylvania. It houses the “Cosmotron” – my favorite amusement ride ever. The word C-O-S-M-O-T-R-O-N flashes old-school style on a red LED screen above the door and oldies music can be heard when the door is open. As you enter, a number of large black-leather and steel sleds encircle a huge disco-ball. You take your seat; the door closes, and the ride begins.


The lights go out. The oldies music fades to silence. After a few seconds, classic rock starts blaring, colored lights start flashing, and the ride speeds up. The smoke machine pumps out white smoke and a strobe light replaces the colored lights. A small child screams and multiple hands start waving in the air to the music, jumping around in the moonlight-like strobe as the ride slows… then stops… then changes direction to reverse. Strobe and colored lights alternate to the beat of the rock music (and I swear the reverse part of the ride is faster and longer than the forward). But since all good things must come to an end, the ride eventually slows. The colored lights flash slower and are replaced by the steady house lights. The same oldies song that was playing before begins again, right where it left off, as the doors open and the hot summer air rushes in, and the fake smoke rushes out.

I don’t know how long the Cosmotron ride lasts, but it is like a moment of Zen in the midst of a hectic day of demands from the children, hot weather, and way-too-much-walking. For a few minutes the kids are happy, the sun is unable to torment me, and I’m dancing in my seat- without stressing my poor feet. I am not “Mother Farmer” at that time. I’m ME: rock-loving, sun-despising, non-nauseated ME. It’s my happy place.

Can we ride it again?

P.S. I don’t know why it isn’t the “Kozmotron” since everything else in that park seems to be “Kozmo”-related. (NOTE:”Kozmo” is the teddy-bear mascot of the park.) There is a fish called “Kod-zmo” and a mini-coaster called “Kozmo’s Kurves”. But this ride is the “Cosmotron”- with a “C”. Odd.