Thursday, January 26, 2012

Pigs: More Fun with Castrations

WARNING: PHOTO BELOW IS SOMEWHAT GRAPHIC. (Post is not.)

Mr. Farmer: Aww... you ruined your yoga pants!
Mrs. Farmer: Nah... it's just a little blood. It will wash out.

That's right, it's castration time again. Wilma's second litter was 18 days old today. Since I was off work and Young Master Farmer had a short day because of mid-terms at school, we finally got down to the business that various emergencies had caused us to put off. We castrated 3 of the 4 males, leaving the last for possible breeding stock for another location.

Averaging 12.5 pounds each, the piglets were, once again, very strong for their size. I held the first, a white, spotty, splotchy little guy, while Young Master Farmer assisted and Mr. Farmer performed the operation. But the process was a little slow, and I soon tired. My right arm, holding the critical back feet, started to ache, then go weak. I could feel the blood draining out of my face as I held on as best I could, and dizziness soon set in. In the end, I had to ask Young Master Farmer to take the back feet while Mr. Farmer finished up, cleaned the wound, and applied the liquid bandage. It was exhausting!

The second and third castrations went better. Young Master Farmer took my position in the chair and held the squirmy piglets by the legs, while I assisted with the head and repositioned him as needed. The operations went fairly smoothly, and Young Master Farmer managed to avoid getting bitten by the sows when snatching the piglets from the pen.

Once again, when all was finished, we were tired and dirty- except for Mr. Farmer, of course, who was as clean as any vet would be after performing surgery. When I went for my shower afterward, I started by pre-washing the blood spots on my pants. I then found that I had a matching blood spot on my leg (yuck!) and dirt on me in places I couldn't believe those muddy little pig feet could have reached! I believe Young Master Farmer still has a muddy smudge on his face that I can't explain either. But the job is done, and we can move on to the next project.

It's a Dirty Job, but Someone's Gotta Do it!

Tuesday, January 24, 2012

Thrift: The Homemade Shampoo Experiment

Several months back, my dear friend Jenn posted a hilarious blog entry about getting sucked into purchasing an overpriced haircare product. At the time I seemed to be getting hit from all sides with haircare: she was bewailing how hers failed, and a number of other blogs I read were going on and on about homemade shampoo and conditioner. I'm a creature of Habit, but I am also a creature of Thrift. So when multiple blogs featuring women with many different hair types exclaimed that shampoo and conditioner could be replaced with water, vinegar, and baking soda, I just HAD to try it.

The recipe was simple:

Rinse out the last shampoo bottle you will ever buy. Add 2 tablespoons of vinegar. Fill the rest of the way with warm water. Shake. Rinse out the last conditioner bottle you will ever buy. Add 2 tablespoons of baking soda. Fill the rest of the way with warm water. Shake. Use as you would normally, skipping the lather step, of course.  That's Strike One for most people: You have to do a little work. It took about 2 minutes, so it wasn't really a negative for me.

The premise sounded too good to be true:

For pennies a month, your hair will be as clean and manageable as it was when you used commercial shampoo. There will be no chemicals on your hair or going into the ground. You will make less waste because you won't be throwing out bottles.

How it worked:

My hair was clean! I have fine, oily, poker straight, dark blonde/light brown hair. After using the homemade combo, my hair was as fluffy and oil-free as it is after using shampoo. I did not experience the static-cling fly aways that conditioner usually handles for me either. In short, it was pretty good! It did not leaving me smelling like vinegar at all. I did not tell Mr. Farmer that I was doing it, and he never knew until I told him.

Why I'm not still doing it:

I remember a very long lecture in high school about the American fascination with scented products. Some report or other determined that more than half of Americans choose their shampoo by scent alone. Another quarter or so choose them by other subjective factors, like how their hair feels while using it and after using it, the brand name sounding luxurious, and the like. In my case, however, it was largely a comfort issue.

It didn't take long for me to get used to squirting a runny liquid over my head instead of lathering. The results were good, and bubbles just end up in your eyes anyway. My problem was with Day Two, Three, Four, etc. You see, on the first day, when you make your products, you mix them with warm water, and go take a shower. After your shower, you stow them in the corner of your bathtub, or in my case, the floor behind the toilet (remember, I was trying to see if Mr. Farmer noticed a smell, so I didn't want to let on that I was doing it). Both the tub and the bathroom floor get cool when not in use. So, on the second day, I get into my hot, steamy shower, get wet and warm, then squirt a generous amount of freezing cold, vinegar-infused water over my head. EEK! Then I rinsed that out quickly, warmed up again, and had to repeat the process with freezing cold, baking soda-infused water.  The shock was terrible, and it made the chore of showering almost unbearable.

And did I mention:

...that for the past 17+ years, ever since Mr. Farmer introduced it to me, I have been using a shampoo and conditioner that top out at $1.29 a bottle? In fact, this stuff routinely goes on sale in my area for as low as $0.69 a bottle! I think it is OK to splurge on this less than two dollar a week luxury for the sake of not squirting ice-cold liquid over my head twice a day.


I can afford this small luxury.

Your mileage may vary, of course. But for me, it just isn't worth it. Of course, if I run out of shampoo, I am never out of luck!

Sunday, January 22, 2012

Hillbilly Ingenuity: Replacement Parts

Well, it's that time of year again. Many of our friends have "bagged their limit" of deer, and those deer need processing. Since we're the only game in town when it comes to a large smokehouse, we became very popular just before Christmas. Friends and their families came by, some with bag after bag of chopped up venison, ready for grinding, stuffing, and smoking. We have made many MANY pounds of ring bologna and kielbasa (click meat-treat of your choice for a recipe).


The downside of doing all this work is that we are very hard on equipment. The average household grinder, for example, is not designed to handle a hundred pounds of meat each year. So, we should not have been surprised to find that the bearings in the grinder had worn down so small that they were falling out. When the other grinder that we had on hand for parts was disassembled and its bearing retrieved, we found this:


That is NOT going to work. Nope.


So, Mr. Farmer did what anyone would do: He went to the Auto Parts Store. He was sure that they would be able to sell him the right size bearings to get him up and running again. He was mistaken. So, undaunted, he went to the bike shop, just to find the shopkeeper locking the front door. She was sympathetic to his plight, however, and re-opened the store. She found the right bearings and rung him up. The total was just over a dollar. Mr. Farmer had no cash on him, and she had already settled out the charge machine. The Christmas spirit was in her, however, and she agreed to trust him to come back and pay her another day.

He did go back and pay her a few days later (much to her surprise) and the day was saved. Another hundred pounds of meat became another pile of treats. Now if only there were spare parts available for vacuum-sealers... (or coffee grinders... or many of the other items we have purchased and flagrantly ignored the warning, "For Household Use Only," printed on the box!)

Sunday, January 15, 2012

Pigs: The Coughing Pig

I was really excited about going to the Pennsylvania Farm Show. I have watched it on television a number of times and really enjoyed it. Mr. Farmer looked at it as part research for a possible entry next year and part family vacation. I didn't even mind that the distance meant that I would have to get out of bed at 3 am to leave at 4 am so that we wouldn't miss the early morning pig exhibits that Mr. Farmer wanted to see. I even begged someone at work to cover my shift that day so that I could go. One of the pigs had other ideas.

A certain black and white pig started coughing about a week prior to the Farm Show. With Wilma expecting, Mr. Farmer wasted no time in finding the culprit. One morning, all the pigs came running out to be fed as always- except one. The last one wandered out, glassy-eyed and visibly thinner than the rest. So he did what any pig-farmer would do: He injected the sick pig with strong antibiotics, and he added a prophylactic dose to the drinking water for the others.

It was too late, however. The sick pig needed a second dose injected, and Mr. Farmer couldn't bring himself to potentially infect the prize pigs at the Farm Show if he himself carried the illness. So, instead of getting up at 3 am, slogging through a cup of tea and fighting to stay awake on a 4 hour drive to Harrisburg, I slept in until past 8 am and... well, that's the story I sat down to write for you just now.

Mr. Farmer's syringe looks like something out of a cartoon. It is an old-fashioned, reusable glass monster with metal rings on it so that you can keep a good grip. He told everyone how he bent a needle doing the first injection, so I figured that maybe those rings were a good idea. The large size allowed him to overfill it a bit, which also turned out to be a good idea...

You see, the first dose was a big help, and while the coughing continued, the pig was feeling better. He was so much better, in fact, that Mr. Farmer knew he was going to need assistance holding him still for the injection. So Young Master Farmer and I put on warm clothes, gloves for better grip, and gear that could get muddy, and went along to assist. Mr. Farmer dumped some food on the ground, we identified the sick pig, and Young Master Farmer grabbed him by the leg. The other pigs were too busy eating to pay any mind, and the sick pig wasn't well enough to squeal or scream. After some shuffling for position, I was able to grab the other leg and hold on. Once I had a good grab I dug my back foot in to keep the kicking from pushing me backwards, and I told Mr. Farmer that we were ready.

The rest of the process was a blur- literally. My hat slipped down over my one eye, but with both hands on the pig's ankle and Mr. Farmer already wiping off the ham with rubbing alcohol, adjusting it just wasn't an option. I held on as best I could, dug in, and waited for the all-clear signal. Out of one eye, under the bottom edge of my hat, I could see the medicine come back out of the needle-stick, then a little blood, then the bent needle going for a second stick, then more liquid running down the hind end of the pig. After what felt like five minutes, Mr. Farmer stepped back and young Master Farmer and I could let go. The sick pig went back to eating as if nothing had happened, in spite of the trickle of blood and extra antibiotic running down its leg.

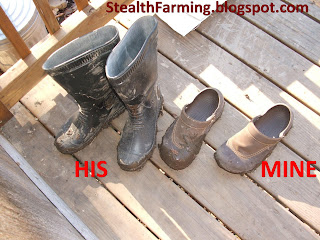
As with any interaction that involves holding pigs still, there were the usual repercussions. The aching back kicked in just after we came home from the evening out, and I took a few pills before I went to bed. My clothes stayed pretty clean, but my rubber clogs have seen better days. They served me well, though, and I am pleased to announce that all pigs have a clean bill of health once again.


This Kind of Thing is Bound to Happen

Monday, January 2, 2012

Cooking: Homemade Hard Candy

If you follow my Twitter or Facebook, you already know that I burned myself making candy this year. I was testing for "crack," that magical (ok, it's science, not magic) change from gooey melted sugar to hard, suckable candy. I dipped a spoon in the goo, waited a couple seconds, then touched it with my finger (better test method described below). IT. WAS. HOT. I blew on it. The goo stuck to my finger and continued to burn me. I knew I had to get it off. So I did what any panicked, burning, too-proud-to-yell-for-help woman would do: I put my finger in my mouth. In my haste, I smeared some of the burning sugar on my upper lip. I quickly put my burning finger under the cold running water in the sink. I burn myself all the time. I'm a pro at this. The relief flooded over me. That was when I realized that my lip was burned. I guess the endorphins kept me from feeling it right away. As soon as I was able, I looked in the mirror to see what looked like a herpes blister on my upper lip. Four days before Christmas. Great.

This is my second year of making hard candy, and I think I have it down now. My first two batches burned this year, much to the dismay of Little Miss Farmer and the delight of the local wildlife who enjoyed licking the burnt sugar off a rock in my yard. Then I located the recipe I used last year and had much better success. Here's what worked for me:

Ingredients

2 cups white sugar
1 cup water
3/4 cup light corn syrup
flavorings (optional)*
food coloring (optional)
confectioners' sugar

*Flavorings that have worked for me:
  • Mild Ginger Flavor - 1/2 tsp ground ginger
  • Sweet Cinnamon - 1 tsp ground cinnamon
  • Peppermint - 1 tsp peppermint extract
  • Fruity - one (0.15 oz) packet of unsweetened drink mix, any flavor (adds color, too!) 

Directions

In a heavy 2 quart saucepan, combine the sugar, water and corn syrup. Cook, stirring constantly until the sugar is dissolved; then cook without stirring, lowering the heat and cooking more slowly during the last few minutes (seriously, do not rush it; sugar burns easily!), to the hard crack stage (EVERY recipe I have seen calls for 300-310 degrees F, but at my altitude, it is about 250 degrees F). An easy (and safe!) way to check for crack is to dip the tip of a dinner knife into the the candy, then plunge into ice water for a few seconds. If it is ice cold and rock hard like a lollipop, but not sticky, you're there.

Remove from heat, add flavoring and enough food coloring to color; stir only to mix. Pour into a cookie sheet or shallow baking dish that has been generously dusted with powdered sugar. Allow to cool slightly, score with a butter knife, and allow to cool completely. (Many people skip this step, but I find little squares more attractive than the "shards of glass" look accomplished by the traditional method of allowing it to cool then hitting it with a hammer.)


I'm not sure if dusting the top helps or not, but I did it...
Break the bits apart after it is completely cooled. Who am I kidding? Some of it is going to look like broken glass no matter how you do it. Toss in a small amount of powdered sugar to keep it from sticking together.

Now the hard part... try to keep the kids out of it!