Sunday, December 19, 2010

Cooking: Pickled Eggs and Beets Has Been Updated

See Referenced Post (now edited): HERE 

My father loves pickled eggs with beets. He has enjoyed them my whole life, and I have seen his eyes light up on many occasions when he was presented with a jar. So once I secured permission from my mother (apparently his current diet restrictions are for sugar, not cholesterol), I prepared a jar just for him at Thanksgiving.

Unfortunately, I have also observed my father storing his prized pickled eggs on top of the piano for months and months, not in the refrigerator. I have never encountered any recipe that states that they are shelf stable after opening, so I decided to take measures. To help protect my father's health (and quite frankly my reputation as a cook), I increased the amount of vinegar in the recipe. In fact, I doubled it. That particular batch had a 1/1 ratio of water and vinegar, which should help slow down bacteria growth. I also put the jar in my parents' refrigerator myself, rather than presenting the jar and giving him a choice of where to store it. We had a wonderful Thanksgiving dinner, as always, and returned to our respective homes.

About a week later, I received a nearly unprecedented phone call. My father was not calling to give me some family news, but instead to tell me that he had just enjoyed the best pickled egg he had ever tasted! After what I estimate to probably be about 50 years of pickled egg tasting experience, I can safely consider him a connoisseur. Therefore, I am permanently altering my recipe to the 1/1 water/vinegar ratio that pleased my father so much.


Christmas Pickled Eggs
(Left: Beets & Right: Italian with Green Dye Added)

Tuesday, November 16, 2010

Hillbilly Ingenuity: Hooch

Moonshine. Corn Liquor. White Lightning. Hooch.

Whatever you want to call it, homemade distilled liquor is an Appalachian tradition nearly as old as Appalachians.

The process for making 'shine is a basic set of steps, with a few variations for strength and flavor. Corn, yeast and water are mixed together and encouraged to ferment, the "wash" (liquid result of the fermenting process) is distilled, and (optionally) flavors are added or the liquor is aged for flavor. Of course the production of liquor is regulated everywhere you go, and downright illegal without licences and so on in other places. Mr. Farmer has some ideas about the process, however, that some might find interesting.

Sugar feeds the fermentation process. It is literally the food that yeast consumes, causing it to grow, reproduce, and die: letting off the carbon dioxide that is the fermentation process. Adding white or brown sugar to the corn will speed up this process. So will malting (partially sprouting) the corn, or adding molasses. Any combination of the changes to the sugar content would change the fermentation times and also the flavor of the end product.

Smoking corn just after malting would add another facet to the flavor of the end product as well. It would be a lot more subtle than aging in a charred barrel, of course, but the green (unaged) product would have just a hint of woody flavor, without actual contact with wood.

With some copper pipe, gauges, and a heat source, building a homemade still would be easy for anyone who is handy with plumbing (I made one myself in freshman chemistry in high school for crying out loud). I guess that's why they had so much trouble keeping those moonshiners under control during Prohibition...

Saturday, November 13, 2010

Life Is Good: Fall Cleaning

Things are a little different when you live in a tiny house. When it is nice outside, you do outside things. After all, it is small inside, and it is big outside- even on my little plot of land. We really don't see much of the inside of the house in the summertime, and late summer harvest time is so busy that life moves at an extremely fast pace. When that is done, fall begins an we recognize the mess we have made of the house all summer, so rather than Spring Cleaning, we do Fall Cleaning.

We make a mess of the house for 2 or 3 months each year as we clean up the yard for Outside Season. All the summer projects result in parts from this and that finding their way into the corners of the house. Furniture gets rearranged to accommodate stuff rather than people. Things get thrown into storage quickly and without thought when there is threat of company that might want a sit-down dinner instead of a barbeque. Tools for house projects like hanging curtains and fixing broken walls are still in the house waiting to be returned to the shed. On the first chilly evening we bring in wood for the wood-stove and realize we do not have sufficient clearance around it to safely make a fire, nor can we get to the outlet to plug in the circulator fan. That is usually the signal that fall cleanup time is upon us.

There is no stopping the cycle of fall cleanup. I spend my weekends acquiring my first sinus infection of the year by reorganizing stuff into plastic bins rather than the dusty, mold-filled, crumbling cardboard boxes that previously held our precious treasures. Mr. Farmer reorganizes his Man Cave to put away his tools for the winter in such a way that he can still access them for unexpected projects. Young Master Farmer cuts, splits, stacks and hauls firewood for the house. Little Miss Farmer gathers kindling, dusts along side her mother, and goes through that box of clothes we put away for the season, AGAIN, and decides what she can and cannot wear through winter.  And we all vacuum the living room carpet in vain, over and over again, in hopes of keeping ahead of the dust, wood chips, and leaves from the wood-stove (as well as the dirt and mud tracked in by hard-working younger and older men).

Fall is a busy season. We harvest; we clean; we lay in food and supplies for winter. Bread-baking and soup-making begin for the cooler weather. The endless chore of firewood preparation kicks into full speed. Is it any wonder why I look forward to the quiet, do-nothing days of winter: sitting in front of the TV with a cup of tea and nothing to do but wonder if we'll be able to use the snow as an excuse to stay home from work tomorrow and make pancakes and bacon for breakfast?

Thursday, November 11, 2010

Hillbilly Ingenuity: The Barter System

The barter system is not new. Trade has always been trade: the exchange of something of value for something else of equal value. This thing called "cash" is convenient for those who have it, and certainly simplifies things when you start talking about international trade or even a trip to the grocery store. Between neighbors, craftsmen, and specialty folk in general, however, the barter system still makes a lot of sense- especially when you have more of something than you need- and so does your neighbor.

The Rules

Value is in the eye of the buyer- and the seller. What impacts value? If you are trading food items for food items, you are on fairly level ground: One meal's worth of venison is worth one meal's worth of pork, if both of you have only one or the other. The same is true of vegetables for vegetables (if your neighbors happen to be badly off enough to need something in trade for vegetables, which is sad), and even milk/eggs/other unprocessed goods for cheese/bread/other processed goods. Things start to get interesting when you are trading skills or equipment for food. That's when you have to remember...

Be generous- what goes around comes around. What is the value of a large, walk-in refrigerator? Ask the hunter/butcher who does not have one, and must field dress, haul home, and immediately butcher and pack a large animal in the kitchen immediately after spending many hours in the freezing cold to track said animal. He would surely rather let it hang and age (ask any butcher how important this is to flavor), and come back in a day or two, well rested, and complete the job instead. If this same hunter lives off the land primarily, then the value of his neighbor's meat grinder and pork scraps for sausage so he doesn't have to hear "Chili, AGAIN!?!?!" from the kids is high value as well. So, in these cases, it isn't that he could not feed his family without the barter, but he couldn't feed them as well. Therefore, he not going to compensate the owner of the equipment with an equal amount of venison for the pork he used in his sausage, or a single meal worth of venison for use of the fridge: he is going to give several meals worth of meat, and have the family over for a big dinner near the holidays.

Give it away if you can spare it- this is called "marketing" in the real world. How about an example this time? While visiting his brother the other day, Mr. Farmer chatted with another Stealth-Farming neighbor of his brother's who happened to be a bee-keeper. He had just finished a run of 60 pounds of honey, so naturally when Mr. Farmer mentioned that I LOVE honey, he was given a little half-pint to take home to me, along with the information that $3 will get us a whole pound of it. Naturally, this is the darkest, most amazing smelling honey I have ever seen, and it is cheaper than the grocery store's personality-free honey. This automatically makes it worth buying when honey is usually something I consider as a "treat" not a "staple" like white & brown sugar or molasses. So I'm hooked. There is a customer for life gained for the sake of a 50 cent mason jar and a quarter cup of honey.

More Examples

  • The use of our butcher knife set has resulted in us receiving the best cut of a lovely deer.
  • The payment for smoking a dozen salmon fillets was 6 fillets.
  • A summer of bringing the homemade pickles to BBQ's and parties was repaid in the fall with a full meal of lamb, potatoes and corn (when a very large roast was found in the back of the freezer by our friend up the road).
  • Smoking a single turkey (gratis) for a friend of ours whose wife loves smoked turkey has resulted in not one, but TWO job offers this month to smoke chickens and turkeys for specialty meat markets.

The return of this old-timey way of doing things has saved me a lot of cash, and formed a lot of bonds with neighbors and friends. It also reinforced some friendships that were getting a little tense. We have a variety of food, plenty of diversion, and some of the best local goods available thanks to our willingness to trade. Life is good!

Sunday, November 7, 2010

Cooking: Pickled Eggs - Italian Style

Pickled eggs are the stuff of legend. Some call them bar food. Some call them Amish/PA Dutch food. But almost everyone who has tried one has a strong opinion on them one way or the other. For those like myself who don't care for the pink, rubbery, beet variety, a friend of our ours recommended a variation something like this:

  • 18 Hard Boiled Eggs, Peeled
  • 1 Small Onion, quartered and sliced thinly
  • 1/2 cup Vinegar
  • 1/4 cup White Sugar
  • 1 cup Water
  • 1 tbsp Salt
  • 1 tsp dried basil
  • 1 tbsp dried oregano
  • 4 cloves garlic, peeled and scored
  • 1 bay leaf
  • 1 tsp whole peppercorns


Place 18 peeled, hard-boiled eggs in a 1/2 gallon jar (I keep old pickle jars). IMPORTANT UPDATE: ONLY USE GLASS JARS! TRUST ME! Add sliced onion.

In a pot, place vinegar, sugar, water, salt, spices, and garlic. Bring to a boil and allow to boil for a full minute, stirring at least occasionally, until the salt and sugar are dissolved.

Pour hot liquid over eggs until half full. Shake the jar to mix, then top off with the rest of the hot liquid and cap.

Allow the jar to cool to room temperature, then refrigerate for at least 3 days.

Now- Isn't that much better than those freakish pink-purple eggs?

Pickled Egg Options

Thursday, October 7, 2010

Cooking: Pickled Eggs and Beets


This was my first try at making pickled eggs with beets. This is my own recipe, based on a few others I have seen, as well as some conversations with friends who said I should put in "a dash of this and a swig of that". They came out perfect!

  • 18 Hard Boiled Eggs, Peeled
  • 1 cup Vinegar
  • 1/4 cup White Sugar
  • 1 cup Water
  • 1 tsp Salt
  • 1 tsp Pickling Spice
  • 1 Can (15 oz) Beets, drained (save juice!)
  • 1 Small Onion, quartered and sliced thinly

Place 18 peeled, hard-boiled eggs in a 1/2 gallon jar (I keep old pickle jars). IMPORTANT UPDATE: ONLY USE GLASS JARS! TRUST ME! Add sliced onion and the beets (but not the juice).

In a pot, place vinegar, sugar, water, salt, pickling spice, and the juice from the beets. Bring to a boil and allow to boil for a full minute, stirring at least occasionally.

Pour hot liquid over eggs until half full. Shake the jar to mix, then top off with the rest of the hot liquid and cap.

Allow the jar to cool to room temperature, then refrigerate for at least 3 days.

YUM YUM YUM! (If you're into that sort of thing...)


UPDATED 12/19/10 - Full Details HERE

Monday, September 27, 2010

Gardening: Tomato Frustration

It's September, and the beefsteak tomatoes are still green. I don't mean that some of them are green, or that the 2nd set is green, I mean they are ALL GREEN. I'm getting ahead of myself. Let's begin at the beginning.

Back in late May we planted 5 tomato plants. 3 were called "Sweet Baby" cherry tomatoes. The other two were "Mountain Harvest" and "Beefsteak" respectively. We didn't want to overdo it with too many plants. Last year, after all, was a horrific failure. What few tomatoes did emerge were quickly taken over by a blight, and we did not get to eat a single one. So naturally, we did not expect too much this year. We were wrong.

In early June we found a tomato plant, growing strong back where the pig pen used to be. This volunteer plant looked so nice and healthy that we decided to plant it in the last spot with the big tomatoes. After all, the bush beans had failed miserably in that spot, so what did we have to lose? The space was probably wasted one way or the other.

The early signs were not great. The tomato plants were tall and spindly with few leaves. So, as soon as the first flowers appeared, Mr. Farmer cut all the tops off just above the flowers. I really thought they were going to die. Instead they stalled- then bushed out! Two rows of flowers turned into four and eight and more! Before we knew it, we were up to our eyeballs in cherry tomatoes- at least we would have been if the tomato plants weren't right next to the front door where all who entered or exited could see them and be tempted by their beautiful bright red color.

Soon after the first cherry tomatoes reddened, the first large tomatoes bloomed. Little tomatoes became big tomatoes and... that's it. They just stopped growing. Hard, full size tomatoes sat on the vine and did nothing as weeks became months. A handful of cherry tomatoes were enjoyed each day along with the thought, "Maybe tomorrow the big ones will turn red." Neighbors and co-workers gave gifts of big, overripe tomato excess from their gardens, and yet ours stayed green.

On the 13th of September, the hail came. A slight blush had finally graced ONE of the large tomatoes and hopes were high. But in the early evening, a furious storm came through, pounding with pea-sized hail and equally large raindrops. The garden looked like it had seen the first fall snow. The only difference was that the white ice was only on the ground, not on the leaves of the plants. We figured our tomatoes were done for.


Much of the foliage on the tomato plants died off, but the large tomatoes remained, and the cherry tomatoes continued to redden. The herb garden wasn't so lucky:


My Poor Parsley- Beaten Flat and Frozen- Perhaps Dead

Our Beautiful Basil- Now Perforated from the Hail


Even My Seemingly Indestructible Chives Succumbed

We removed as much of the hail as possible as quickly as possible, and the work paid off. But the large tomatoes are still green. They are dented, but they are still rock hard and dark green. I wonder if we will be able to eat any of them before the first frost hits???


*****LATE SEPTEMBER UPDATE!!*****

They're red! Finally! As of September 27, we have SIX red tomatoes, and several more are beginning to blush. We might be able to eat them all before the leaves are off the trees and the first snow falls after all!

Saturday, September 18, 2010

Cooking: Sunday Night Steak Chili

I call this "Sunday Night" Steak Chili because:

1) I made this exact recipe on a Sunday Night.
2) It is labor intensive, so it took all Sunday afternoon to make.
3) It is appropriate for company or Sunday night dinner.

Ingredients:

1 large onion -coarsely chopped
4 cloves garlic - peeled, ends off, scored
1.5 lb London broil, cubed large
Pickled Jalapeno Peppers
Salt and Pepper
2 cups mild salsa (jar or homemade - or substitute 1 large can whole tomatoes, chopped, with juice)
1 lb dried red kidney beans

In large crock pot (or stove over low heat) add onion, 3 of the cloves of garlic, the London broil, 2 tsp salt, 1 tsp pepper, and jalapeno peppers (I used 5 pepper slices plus 2 tsp of the pickling liquid. You may want to use more or less depending on if you use salsa or tomatoes and how hot you like it.). Cover and allow to cook slowly, stirring occasionally.

Prepare the Beans (obviously, you could skip all this if you used canned beans- just drain them.):
Rinse beans and put on stove to boil.
After 15 minutes at a full boil, remove from heat, strain, and rinse again.
Return to stove for a 2nd boil, this time adding the remaining garlic clove and 1 tsp salt.
After about 30 minutes (or when beans are almost completely cooked), drain and add to meat in pot.

Add salsa or tomatoes, cover and cook. The longer the better, but at least 2 hours.

*NOTE: I used this salsa in my chili for the tomato part... Fresh Salsa Recipe http://goo.gl/b/Knz9

Thursday, September 16, 2010

Cooking: Smoked Hard-Boiled Eggs

You can smoke lots of things to make them yummy. When we heard smoked hard-boiled eggs were an option, we just HAD to try it! You can't taste them on a blog, I'm afraid. But if you like snacking on eggs, then you would like these. The smoke flavor is subtle, not overwhelming.

We partially boiled the eggs before we smoked them. Basically we covered them with water, brought the water to a boil, and instead of boiling for 10-12 minutes, we took the boiling pot off the heat and let it stand for 12 minutes. Then we drained and rinsed the eggs in cool water, broke the shells (to let the smoke in better), and placed them into a nylon stocking to hang in the smokehouse. We hot-smoked them for about 2 hours (though I have heard that as little as 45 minutes is plenty).

The result was fully cooked, slightly smoky eggs for snacking, deviled eggs, or egg salad. Yum!

Eggs - Sharing the smoker with the chickens

Sunday, September 12, 2010

Cooking: End Of Summer Macaroni Salad

Seasonal food is about what is fresh, available, and cheap (at the moment). Summertime is Salad-Time, and it may seem like I'm out of order by posting the last salad first, but here it is just the same. It is a sweeter salad because of the peas and peppers, but variety is good! As with all of my recipes, this is a large family/company/covered dish dinner sized meal. Cut it in half if you are only feeding 2 or 3 people, or if your kids aren't teenagers yet.

  • 1 lb dry pasta (I like medium shells with salad that has peas in it, but pick your favorite.)
  • 1 small onion, finely chopped
  • 1 super-large or 2 regular-sized red bell peppers, finely chopped
  • 1 1/2 cup sweet peas (that's a 15 oz can if your peas failed this summer like mine did - otherwise, give fresh ones a quick boil)
  • 4 hard boiled eggs, peeled and coarsely chopped
  • Vegetable oil
  • 1 1/2 cup mayonnaise
  • Salt and Pepper to taste
Bring water with a little salt to a boil. Once boiling, add pasta and stir. Cook until completely done, strain, rinse and cool.

While your water is boiling is a good time to chop up all those veggies and eggs, and shuck peas if needed. Once the pasta is ready, toss everything together EXCEPT THE MAYO. The little bit of vegetable oil will keep the pasta from sticking while it cools. Chill until at least room temperature (completely cool is even better) then add the mayonnaise. This will keep the mayo from separating, and is also good food safety.

It may go without saying, but I will say it anyway: Keep hot foods hot and cold foods cold. For outdoor picnics, place any salad with mayo in it into a larger bowl filled with ice for safety. Besides, most people like their summer salads ice cold anyway (I have met one exception, and one only).

Friday, September 10, 2010

Cooking: Whole Smoked Chickens

The smoking process we use to smoke chickens is more of a flavorful cooking method than a preservation technique. For long term storage of these chickens, we zipper bag or vacuum seal and freeze them. Inexpensive whole fryers work just as well for this method as roasters, and we use them almost exclusively.


***STEP 1: CURE***

Thaw birds (if necessary) and remove gizzards as needed. Check for feathers that might have been missed and remove.


While we do not prefer it for ham, we LOVE Morton’s Sugar Cure for smoked chickens. Add about 1 tablespoon of cure per gallon of water and brine, chilled, for at least 24 hours. If you don’t have a large enough refrigerator, you can add ice a few times a day.


*** Step 2: PREPARE***

Drain chickens and insert each into a knee-hi nylon stocking. The stocking makes a nice bag with a handle to hang the chickens by and also makes for a very even brown skin. Special thanks to our neighbor from the old country in Lithuania for this little trick.


Whole Chickens Hanging in Stockings (Draining)


***Step 3: SMOKE***


Hang chickens from smoker by the tops of the stockings. Hot smoke for 10 hours for 5 pound average birds.


Chickens in Smoker
Smoker in Action


Mr. Farmer doesn't care to share his exact cooking times just yet. If he does, I will update. But look how pretty and brown they look once they are fully smoked!


Whole Smoked Chickens - YUM!


Our preferred hardwoods for smoking chickens are cherry and maple, but hickory is nice too.

SERVING SUGGESTIONS:

1) Serve hot, roast-style, with potatoes. If you are going to smoke whole potatoes, parboil & pierce them prior to smoking. The low temperature of the smoke will not sufficiently cook the potatoes even in 10 or 12 hours. Trust me.

2) Cold smoked chicken is great for picnics. Just throw it in the cooler and take it along. Great on cold sandwiches or just as a side with potato, macaroni, or green salad.

3) Chicken Salad: Pull chicken, chop small, and mix with mayo, celery, & onions.

4) Pulled Chicken: Pull chicken, mix with just a little of your favorite BBQ sauce (maybe one day I'll post Mr. Farmer's recipe) and heat. Serve on round rolls with potato salad.

Monday, September 6, 2010

Hillbilly Ingenuity: The Smokehouse

The basic smokehouse setup is really fairly simple. Smoking is an indirect kind of cooking that combines heat (sometimes) and smoke to flavor and in some cases preserve foods. Most smokehouses consist of a smoking/cooking chamber, a fire box, and a pipe to connect the two. Additional amenities can be added or removed depending on your needs.


**THE FIRST SMOKER**

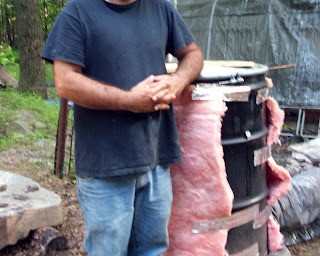
Mr. Farmer often speaks of writing a book called “101 Uses for a 55 Gallon Drum”. This is one of those uses.


The first smoker setup consisted of a 55 gallon drum with a lid. Mr. Farmer fitted a pipe into the bung as a smokestack, drilled a small hole in the side to insert a thermometer, and a larger hole for the smoke pipe in the side near the bottom. A few more holes near the top were drilled to fit a few pieces of concrete re-bar to hang meat.


Then he built a simple firebox out of local stone around the other end of the smoke pipe, and covered the top with wet sandbags to keep the smoke in while cooking. This was inefficient, so he pasted it closed with mortar.


After a few attempts, he found that it was hard to regulate the temperature, so he wrapped the drum and pipe in standard household fiberglass insulation. A number of hams and bacons were processed through this simple smoker.

**THE UPGRADE**

The new and improved, Upgraded Smokehouse was built on the same site, starting with the same stone firebox. The firebox was expanded to a larger size and cemented closed for a more permanent smoke seal. A metal door was also added for easier feeding.


The new smoke chamber was built of pine, and we jokingly refer to it as “the outhouse” since its design is very familiar to that country standby.


To differentiate it from an outhouse, we considered putting some artwork on the outside to indicate what might go on inside. Little Miss Farmer (12) is quite the artist, so we asked her to draw a pig for us to wood-burn onto the outside of the smoker:


We decided against that particular design- at least for now. The smoke chamber, for now, remains unadorned. There are 2 thermometers- one in the door and the other in the smoke vent (a ladder is needed to see the vent thermometer).


So far we have processed hams, chickens, and even hard-boiled eggs through this smokehouse. During longer smokes we hose down the interior with cool water- you can see a bit of charring and smoke buildup inside.

Friday, September 3, 2010

Off Topic: The Zen of The Cosmotron

An unassuming, single-story grain silo is tucked behind the classic Tea Cup ride and the very popular “Paratrooper” at Knoebels Amusement Resort in Elysburg, Pennsylvania. It houses the “Cosmotron” – my favorite amusement ride ever. The word C-O-S-M-O-T-R-O-N flashes old-school style on a red LED screen above the door and oldies music can be heard when the door is open. As you enter, a number of large black-leather and steel sleds encircle a huge disco-ball. You take your seat; the door closes, and the ride begins.


The lights go out. The oldies music fades to silence. After a few seconds, classic rock starts blaring, colored lights start flashing, and the ride speeds up. The smoke machine pumps out white smoke and a strobe light replaces the colored lights. A small child screams and multiple hands start waving in the air to the music, jumping around in the moonlight-like strobe as the ride slows… then stops… then changes direction to reverse. Strobe and colored lights alternate to the beat of the rock music (and I swear the reverse part of the ride is faster and longer than the forward). But since all good things must come to an end, the ride eventually slows. The colored lights flash slower and are replaced by the steady house lights. The same oldies song that was playing before begins again, right where it left off, as the doors open and the hot summer air rushes in, and the fake smoke rushes out.

I don’t know how long the Cosmotron ride lasts, but it is like a moment of Zen in the midst of a hectic day of demands from the children, hot weather, and way-too-much-walking. For a few minutes the kids are happy, the sun is unable to torment me, and I’m dancing in my seat- without stressing my poor feet. I am not “Mother Farmer” at that time. I’m ME: rock-loving, sun-despising, non-nauseated ME. It’s my happy place.

Can we ride it again?

P.S. I don’t know why it isn’t the “Kozmotron” since everything else in that park seems to be “Kozmo”-related. (NOTE:”Kozmo” is the teddy-bear mascot of the park.) There is a fish called “Kod-zmo” and a mini-coaster called “Kozmo’s Kurves”. But this ride is the “Cosmotron”- with a “C”. Odd.

Sunday, August 22, 2010

Cooking: Fresh Salsa Recipe


First, the spicy...

Peel and Finely Chop:
1 small onion
3 large (or 4-5 small) cloves of garlic

Remove Ribs and Seeds (Unless you are adventurous) and finely chop:
3 fresh jalapenos (from my co-worker's garden)

Then the acid...

Add:
1 tbsp lemon (or lime) juice
1 tbsp vinegar

Coarsely Chop:
3 large red tomatoes (from my neighbor's garden)
1 large yellow tomato (from my co-worker's garden)

Finally, the seasoning....
1 tsp salt

Toss all of the ingredients together. Refrigerate at least an hour before serving.

NOTES:

  1. This is even better if you make it a day ahead.
  2. Of course you don't have to use your neighbors' produce. You could use your own. But mine are stalling this year and I can't wait! 
  3. If you DO use your neighbors' tomatoes, chances are they were extras they couldn't use, and therefore overripe. If so, drain your salsa before refrigerating. It should look more like a salad than a salsa when you put it in the fridge. It will make more juice as it rests.
  4. Different colored tomatoes aren't necessary, but it really makes a pretty salsa. Go ahead and use 4 red ones if you like. Seriously, cooking is an art, not a science.
  5. Yes, this is MY recipe, one I actually made. I like it. You may want cilantro, but I don't have any. You may not like it at all. That's OK, it won't hurt my feelings. I bet there are thousands of salsa recipes on the Internet. I bet a few are even better than mine. But this is a good one; I promise.

Friday, August 20, 2010

Hillbilly Ingenuity: Impromptu Charcoal Grill

Here's the scene:

It's Friday night. You've got this lovely piece of pork, but it's "store" pork- the pre-seasoned kind. You bought it on sale, and weren't thrilled with the flavor last time. You are certain that it would taste so much better with a smoky flavor that only charcoal and some real hickory can give. What to do? Here's how Mr. & Mrs. Farmer solved the dilemma.

*******

Mr. Farmer: We need to figure out how we are going to cook this pork. We don't have a charcoal grill.
Mrs. Farmer: So what? We have a metal wheel-barrow and an oven rack...
Mr. Farmer: No, not the wheel-barrow. We have the stone fire ring that we use to boil water for skinnin' and pluckin'!
Mrs. Farmer: And we have this re-bar that you welded into a grid for... why did you do that?
Mr. Farmer: It supports the 55 gallon drum we boil water in.


Mr. Farmer: The pork is smaller than that, but I hate to risk ruining the oven rack.
Mrs. Farmer: What about the rack from the gas grill?


Mrs. Farmer: So we have a fire, a means of support, and a rack. What will we use for a lid?
Mr. Farmer: The roaster pan lid!


Discounted "Store" Pork Loin: $3.50
Bag of Charcoal: $6.99
Lighter Fluid: $2.99
Bag of Potatoes: $3.99
Hillbilly Ingenuity: PRICELESS


Thursday, August 19, 2010

Chickens: First Egg (No Shell!)

Commercial egg producers pay little attention to the soft, semi-transparent first eggs laid by their chickens. After all, even if these odd little wonders could survive the harsh machinery and sterilization process, without that smooth, white(or brown) shell, they just can't sell them. So what interest could they possibly have in them?

One of the coolest parts of being a farmer in a suburban setting is the shock factor. So many city-dwellers have no idea where their food comes from, and most would rather not know. Still every now and then you encounter one of these exciting moments where you can shock and amaze without terrorizing and disgusting your audience. These moments are pure magic. The no-shell egg is a great showpiece for the "Really? I didn't know that!" set.

**********************

I did a search on "shelless eggs", and for a moment became very excited because there was next to no information on them. For one brilliant moment, I was sure that I was about to compose a blog that would change the agricultural world forever.

Then I realized that "shelless" wasn't a word.

However, when I searched for "Eggs without Shells" I found that I might just have the coolest shell-free egg photos on the net. And your reward for sticking with me through this rambling post is that you get to see them.


"Shelless" Chicken Egg


Mr. Farmer Squishing Soft Shell Egg


No Shell Egg Squish
(and Accidental Dish Detergent Endorsement)


PS- For those of you who found your way here looking for "What do I do if my chicken lays eggs without shells?" here is your answer:

Don't worry about it. Chances are that your chicken, like mine, will start wrapping her eggs in shells in no time. If not, then you've got a defective chicken, but they are very rare. The third possibility is that your chicken might be sick, but probably only if she was previously laying normal eggs. In that case, better to analyze all of her symptoms before making any quick judgements... but a little extra calcium in her diet wouldn't hurt.

Tuesday, August 10, 2010

Chickens: Bumble Foot

We lost 4 chickens to Bumble Foot this past week. These were the remaining 4 chickens, over 2 years old, from our very first brood. They were leghorns that gave many extra large to jumbo eggs at least every other day, but usually daily.

Bumble Foot is basically a staph infection of the foot in chickens. It is caused by the infection of small cuts on the unprotected feet of the not-so-concerned-with-cleanliness, not-so-bright, egg laying machines that we love so much. The cuts are from jumping off the perch by older or overweight birds. Ours fell into the former category.

So naturally I was concerned when large, fluid filled boils started appearing on the feet of the older chickens, right when some of our 30 new chickens became mature enough to start laying. After all, it could be contagious, and that's a big flock to risk. So we separated them immediately, cleaned the pen and the chicken house, and started the entire flock- sick or not- on an oral antibiotic.

When the sick chickens did not improve in a few days, Mr. Farmer decided it was time to intervene. Like any boil, the procedure is the same: Lance, Clean, Medicate, and Bandage. During that intervention, I discovered that maybe I'm not as "Little House on the Prairie" as I'd like to think I am.

We put  the first chicken head first into a burlap sand bag, so that just her feet were showing. She was calm and agreeable throughout the procedure, for which I was grateful. Unfortunately, the smell of the thick, white pus, combined with the fact that it was actually semi-solid and almost stringy, made me dizzy, and I had to sit down. After a moment of recovering, Mr. Farmer was able to go back to opening the boils with a scalpel. It was no small task when you consider the callus on a 2 year old chicken's feet. We had to repeat the process 3 or 4 times per chicken, so we stopped after the second one out of exhaustion. Mr. Farmer had to stop after each boil to wipe sweat away, as it was hot out and he had to bend over to reach the chicken in my lap as I sat with her. He tied gauze to the cleaned and medicated wounds, and put them back in the quarantine pen.

The chickens did not peck at their dressings or each other, but they did not improve either. Based on that, we decided it was time to dispatch them for the sake of the rest of the flock. Retiring them was not really an option either, since the infection would have undoubtedly spread to their blood and killed them slowly and painfully anyway.

So ends the first (and VERY successful) run of egg producers in my back yard. The second string has stepped up to the plate and is laying in full force now. The eggs are smaller, but they should get bigger as the birds mature.


"Dirty Butt" and Her Sisters


The New Brood - 2 Days Old - May 2010

The New Brood - Almost Ready to Lay - July 2010


Sunday, August 8, 2010

Ducks: The Dilemma

The following is a discussion we presume occurred in recent weeks in our mini-barnyard. The names have been omitted because we don't name our animals. They are livestock, for crying out loud, not pets.

Duck: What do I do? They killed my brother! I think they ATE him!
Chickens (Smugly): They don't kill us.
Duck: Well, why do YOU get to live? They killed the pigs, too.
Chickens: Hmmm... we lay eggs. Maybe it's because they can eat the eggs, so they don't have to eat us.
Duck: Eggs? Yeah, that makes sense. Pigs can't lay eggs, either! But I'm a bird! A GIRL bird! I can lay eggs!
Chickens: Go for it. It's worth a try.

And so, within days of her brother's (ahem) passing, the duck lays an egg. We give her straw and decide to let her live. Her eggs are big, strong, and delicious. There is much joy in the barnyard.

But, alas, the joy was short-lived, as in less than a week, she is no longer able to lay. Should we eat her? She is cage raised and tender like her brother, I am sure.... but she laid an egg. And egg-laying birds don't get eaten. Besides, Mr. Farmer says she likes me.

Oh no. I think she's a pet. I might have to name her now.


Duck

Saturday, August 7, 2010

Welcome

First and foremost, I would like to differentiate between Stealth Farming and something commonly referred to as Night Farming. Growing up in rural Pennsylvania, I was introduced to the term night farming by my father. On a long trek on our bikes one day, my sisters and friend and I encountered what to our tween-age eyes was surely the largest, most fruit laden pear tree on God's Green Earth. On a hot summer afternoon, where the lemonade we had brought for the trip had long since run out, this was without a doubt the most beautiful sight we could ever hope to see. And with no sign of the farmer around, we helped ourselves. That evening, as we shared our adventure with the man now called Grandfather, he told us stories of his youth and helping himself to the neighbors' gardens.

This is NOT what this blog is about.

This blog is about Stealth Farming: Practicing the Rural Arts in a Suburban Setting. Maybe your township, like mine, says you don't have enough land to raise chickens. Perhaps your neighbors, like mine, are happy to attend the pig roast on special occasions, but don't like to admit that the delicious animal they are enjoying died (and lived!) on their block. Or could it be that it is wonderful to eat roast duck in a fancy restaurant, but it is icky to see one served at a family dinner, in spite of the fact that it is highest quality, hormone free, and fed nothing but the best its whole life?

In these hard economic times, small farms -like kitchen gardens- are becoming more popular and perhaps even necessary to the survival of the lower and lower-middle class. More and more are hunting, trapping, and farming to live. Yes, to LIVE.

This blogger has a family to protect, and a low enough income that a fine would be a hardship. So, in stealth, like we farm, I will write.

Anonymously,
Stealth Farmer